Posts tagged ‘crafts’
Must Love Dots
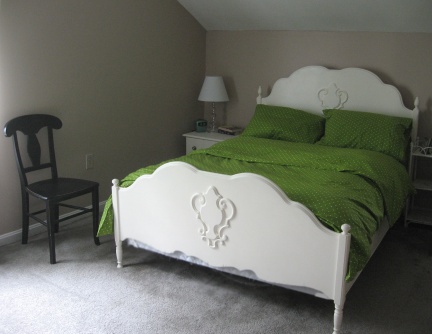
A couple of weeks ago, I was thrilled to find some very cool sheet sets(green with white polka dots!) at a very cool price. Yes, I get excited about sheets. What can I say– I’m a textile geek. I snapped up two sets– we need four pillowcases anyway, and it’s nice to have an extra fitted sheet. With the two flat sheets, I made a duvet cover for our down comforter. Nothing complicated about it, but I thought I’d share the process in case it helps to get someone else’s wheels turning.
—————————————————————————————
(1) Since all the seams on the sheets are already finished, a top-stitch around the perimeter should be sturdy enough to hold the duvet cover together– so no need to sew the whole thing together inside out and turn. Just pin the two sheets together, right sides OUT. I used what had been the tops of the sheets as the bottom of my duvet. [Here’s why: at the top of these particular sheets, like many sheets, about six inches of the fabric was turned over at the top and sewn down when it was manufactured. At the bottom and on the sides, there is only about half an inch of fabric turned over. Since the bottom of my duvet cover is going to have an opening (although it will be closed with velcro, buttons, or snaps), a little bit of the inside of the duvet cover will sometimes be visible and I don’t want the wrong side of the fabric to show.]
(2) Begin sewing (using a pretty small machine stitch for strength) about four inches from the center of what will be the bottom of the duvet. I chose a seam allowance that felt right when I lowered the foot (remember you’re dealing with sheets that already have seams around the edges, so you do have to work around them.) When you begin, you want to start with at least four or five backward stitches, and then start going right over them again as you begin sewing forward. Do the same thing when you reach the end of the seam– this will strengthen the places you’re going to be yanking on when you pull your duvet in and out of the cover for washing. Sew all the way around the outside (yawn) and stop about four inches from the other side of the bottom of the duvet, leaving about an eight inch gap. The easiest way to close the gap is with iron-on velcro. Buttons would be great if your machine makes buttonhole.
(3) If you get annoyed with the duvet sliding around and bunching up inside the cover, try this trick: sew ribbon ties onto each cover of your duvet, and a ribbon loop into each corner of the duvet. Then when you put the cover on, you can just tie the corners into place, and no more slipping around! When I lived in Japan, I noticed that many duvets and duvet covers came this way when you purchased them– genius! I haven’t gotten around to doing this yet because I was eager to get my new duvet onto my bed, but I plan to.
I hit one unexpected snag– it turned out the sheets were not exactly the same size. Yes, they were both full-sized sheets, the exact same brand, style, and color, but one of them was a full two inches longer than the other. So my plan for this to be a super simple project didn’t quite work out. I had to trim the excess off of the longer sheet and hem it, and then topstitch the two sheets together. Grrrrr.
If you don’t have two matching flat sheets, you could use two coordinating sheets. This would be a great use for vintage thrift store finds. You could simply use one as the front of the cover and one as the back, or if you really wanted to make things interesting, you could cut the sheets up and piece them back together so that you had part of each sheet on both the front and the back. You could do this in a very simple manner by cutting one strip out across the width of each sheet and then sewing it into the other. Maybe I’ll try that next time.
————————————————————————————–
Oh, and P.S.– no comments about my shoddy bed-making! I come from the toss-your-duvet-on-the-bed-and-be-done-with-it school of thought, and I wouldn’t have it any other way.
A new sofa for a new home…

I love my new sofa! It’s going to look so great in our new place. This shade of green is just perfect. Only at IKEA can you buy a sofa in pieces and fit it comfortably in the backseat of a tiny Kia Sportage!
The icing on the cake is that the people who will be moving into our old apartment (which is kind of surreal to think about) are very happy to be inheriting our old couch. We won’t have to move it (which is a big deal because it’s pretty huge) and I won’t have to feel guilty about it going into a landfill, so it’s a win-win situation!
Let the sewing of throw pillows begin.
A Crafty To-Do List
For the next few weeks, I’ll be busy packing and unpacking, cleaning, decorating and all the other (ahem) joys that go along with moving. There won’t be a whole lot of crafting going on, although I do hope to somehow make some curtains, a duvet cover, and a baby gift for a friend. How I’m going to manage that with most of my crafts supplies in a box remains to be seen. In the meantime, I thought I’d post a list of things I hope to try (and blog about) once the craziness of the move is behind me.
- Sashiko (Japanese embroidery)– The Portsmouth Fabric Company is having a class on Sashiko in May– sign me up!
- Print Gocco— I want to try it before I buy it– I’d love to find a local class. I want to print my own fabric or try making something like this.
- Fabric-covered switch plates! This is just the beginning of my plan to cover everything in my home with fabric.
- Homemade paper from junk mail. Cool.
- Experimenting with shrinky dinks
- Magazine holders from cereal boxes
- Embedding objects in resin— Okay, this one is highly toxic, but I want to try it!
- The Eliot School in Jamaica Plain has all kinds of cool classes— I want to take the upholstery class, and maybe digital photography.
This list should keep me busy for a long time to come. Of course, before I get around to all of these fantastic projects, I’ll probably get distracted by others. Ooooh, like the free embroidery pattern posted last week on Wee Wonderfuls. Or Suey, the Super Sock Pig! Here I go again…
Home Sweet Home
When my Anthropologie catalog arrived last week, I was immediately drawn to these photographs. It’s a crafter’s dream– an upholstered HOUSE. Look closely– the artwork on the walls is made of cloth. The paneling on the walls and the doors is all needlework. Even the light switches are stuffed! Impractical, yes. But so pretty!


I have house and home on the brain these days because we’ll be moving at the end of the month. We’ve been in Salem for three years now, which is the longest I’ve stayed anywhere in a really long time. There’s definitely something to be said for sticking around for a while and really getting to know a place. In some ways I’ll be sad to leave Salem because there are lots of things about this little city that I’ll miss. I’m really going to miss being able to wander around downtown on a whim. I love just heading down there on a warm Saturday with no idea where I’ll end up. Sometimes as I walk around the back streets of the Derby Wharf area or past the McIntire mansions of Chestnut street, I feel like I’m transported through time. I imagine what life was like here a hundred years ago, or two hundred years ago. I can almost hear the clatter of horses’ hooves as they pull carriages through the cobblestone streets. Oh wait, that IS the clatter of of horses’ hooves as they pull carriages (full of toursists) through the cobblestone streets.
I’ll miss seeing the harbor every day and smelling the salty air. I’ll miss brunch at Red’s, the Peabody-Essex Museum (which has a really cool photo exhibit of the art of Maori tattoos right now, check it out!), and frozen yogurt delivery until 11:00 pm! (Sometimes, you just gotta have it in your pajamas.) Of course, I’m NOT going to miss the traffic, trying to park downtown during a snow emergency, or shopping at the black hole that is Salem Market Basket.
As for our apartment, I do like it but I don’t think there’s much about it that I’ll truly miss. I’m definitely not going to miss having only one kitchen cabinet and almost no counter space. Sayonara, grimy bathroom floor. You are someone else’s pet peeve now.
All Aprons, All the Time
This blog has gone a little apron-crazy lately. I made an apron for a friend back in January and I blogged about that. Next, I won a lovely apron in a giveaway and I blogged about that too. Last week I made another apron for the Sassy Apron Swap, which I wrote about in my last post. Now I have another apron to write about…
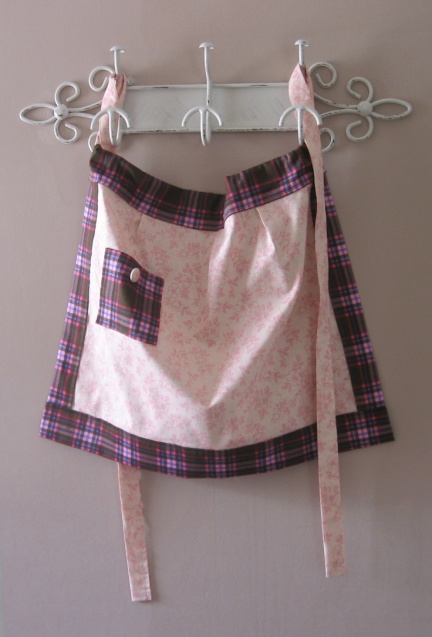
I received an apron from my swap partner on Monday. It came from Adrienne in Jacksonville, Florida and I love it!! When I signed up for the swap, I mentioned that my kitchen is orange. Adrienne took that and ran with it and made me a beautiful reversible orange apron. Adrienne posted pictures of both sides of the apron on the swap’s Flickr site, here and here. One side has a round pocket, and the other side has a kangaroo pocket. All of this is very cool to me, because I’ve never attempted a reversible apron before, nor anything other than a typical square pocket.
The winter here in New England can be very long and dreary. This apron definitely helps me to think spring! Adrienne included even more Florida sunshine in the package, in the form of some yummy citrus fruits! I think it’s fun to see people enjoying their handmade gifts, so I thought I’d post a picture here of the apron in its new home. (The fruit, by the way, is long gone!)

Doesn’t it look great in my kitchen?! Thanks so much, Adrienne!! Your thoughtfulness is very much appreciated.
Sassy Apron Swap
I signed up for the Sassy Apron Swap a while back. The finished apron was supposed to be mailed to my swap partner by Saturday. I didn’t get it done in time, but I figured I’d take the weekend to finish it at my own leisurely pace and send today (Monday) via priority mail– no harm done, right? The theme of the swap is springtime, my swap partner said she liked pinks and browns and the shabby-chic look, and I wanted to use fabrics I already had in my stash. Here’s what I came up with:
That brown plaid might look familiar from one of my past projects. After sewing it together, I kept staring at it thinking something was missing. I decided it needed a button, so I made a fabric-covered button and I think that was just what it needed. If you’ve never used these, you’ve gotta try them! They’re fun to make and the possibilities are endless.

Hopefully my fellow swapper (swappee?) isn’t reading this so that it will be a surprise. Now, to wait by the mailbox for my apron to arrive…
Love sought is good, but given unsought is better.
I recently read this editorial in Time Magazine, which traces the dubious historical roots of Valentine’s Day, and argues that as adults we should just ditch the whole holiday. While I don’t wholeheartedly (*rimshot*) agree with its conclusion, I can’t dispute its central argument: love can’t be scheduled on a calendar, and romance born of duty isn’t romance at all. As the author astutely puts it, “for those who feel well loved, every day, of course, is Valentine’s. For the rest, no card can console.”
Today, my hubby will get this handmade pillow. It’s filled with brown rice and can be heated in the microwave and used for easing aches and pains or warming up on these cold February nights. It’s a very simple project– it took me less than thirty minutes to put together. If you’d like to make this for one of your loved ones, check out this simple tutorial that I used as my starting point. (I changed the dimensions a bit and added a ribbon loop, but Blair’s tutorial is perfect just as it is.)
If it’s too late for you to get this done in time for Valentine’s Day, that’s just as well. Your loving gesture will be appreciated all the more when it’s completely unexpected. That said, I think Valentine’s Day is a great excuse to do something nice for the one you love, and to wax romantic… as long as you remember to be sweet to your sweetie tomorrow too, and the day after that.
Ben Kweller, “Until I Die”
Yowza! I am one lucky gal.
Look at this gorgeous apron made by the very talented Morgan at One More Moore:

And guess what… I won this beauty! Thanks so much, Morgan– I’m so lucky to have won such a lovely prize!
Sewing for Charity: Finished Quilt!
Things have been quiet on this blog for almost two weeks! I’ve been fighting off a nasty cold for the last few days, but I managed to finish a quilt for the Baby Blanket Drive over at Barakah Life. As I explained in an earlier post, Khadija at Barakah Life will be traveling to Mauritania, West Africa and hand-delivering all the handmade blankets she collects to new and expectant mothers there. Because her trip has been delayed until March, she has extended the deadline to February 29th, so there’s still time to get involved! Check out the website for details.
When I sat down to plan this quilt, I realized it’s been a long time since I last quilted. The last one I can remember doing was over seven years ago, now that I think about it. Making this one has renewed my interest, but it has also reminded me how much work is involved. For me, it’s most enjoyable to quilt when there’s no real time line involved– when I can just pick up and put down the project as I wish. I’ve decided my next quilting project will be a throw quilt for our living room, so I can finish it whenever I want to!
For this quilt, I experimented with an interesting way to piece together the front. The idea was to create a pattern more complex than a basic checkerboard pattern without any having to do any tricky sewing. I did this by piecing squares together in a basic checkerboard pattern, cutting up the pieces in various ways, rotating them, and sewing them back together. I’m not totally happy with the pattern that emerged, but I think I’m on to something. I just need to work on the method a bit more, and once I’ve figured it out I’ll post a tutorial.
In the past, I’ve always hand-tied my quilts, so I never actually quilted the front to the back before. I wanted to try it this time, because I love that bumpy, quilted look. I know myself, though, and I will never have the patience to do all that quilting by hand. So I machine-quilted for the first time! For my first time, I wanted to do something very simple, so I just quilted around the inside of each piece on the front, using the edge of my presser foot as a guide. It was quite simple to do, but it was surprisingly time-consuming. I can only imagine how long it would have taken to do by hand. It was worth the effort, though, because the finished effect is really lovely. I have read that machine-quilting should be done with a walking foot, but I didn’t have one so I just used my usual presser foot. Perhaps that’s why it took so long? Next time around, maybe I’ll buy a walking foot and see if that speeds up the process.
Without further ado, here are a couple of photos of the finished quilt:


Thanks again to Khadija at Barakah Life for organizing the drive. I’m so happy to have been involved.
A (Dish)rags to Riches Story
Well, not exactly. Actually, this is the story of how half of a dishtowel became a cute hostess apron. I saw this dishtowel in Target and fell for it. The color is great and I love how I can’t decide whether the print is more Scandinavian contemporary or mid-century modern… pretty good for a dishtowel from Target.

The tricky part about transforming this dishtowel into an apron was the size– it was 18″Wx30″L, and the print ran vertically, meaning the apron couldn’t be any wider than 18 inches unless I added some trim on the side, which I didn’t want to do. I also didn’t want the apron to be longer than it was wide, so I decided to cut the dishtowel in half, leaving me two 18″Wx15″L pieces. I figured that I would add about an inch when attaching the trim to the bottom and the band at the top, leaving me with about a 18″Wx16″L apron. Yes, that’s pretty small. Perhaps too small– but I had a small person in mind for this apron, and I couldn’t resist the idea of being able to make an apron out of half of a dishtowel (leaving me to devise plans for the other half… another apron? Cocktail napkins? Coasters?) I envisioned this apron spending its days serving hors d’oeuvres and martinis on Saturday nights and looking cute while flipping pancakes on Sunday mornings, and not doing much in the way of protecting against giant splatters of grease anyway.
I didn’t add any pockets. I don’t really see the need myself, and when in doubt I’m all for taking the path of least resistance, so I haven’t put a pocket on an apron yet. Most aprons have pockets though, so am I missing something? (Opinions, please!)
Click here for more apron posts!
Want to try this at home?
If you’re starting with a dishtowel or napkin, there is no need to hem anything, and the dimensions of your apron have already been decided for you by the size of the dishtowel or napkin you’re using. I think 22″Wx18″L would probably be ideal, but go with whatever you have. Maybe you have a cool dishtowel lying around the house and you can upcycle it. Or, you could buy a really cool dishtowel. I got a Crate and Barrel catalog in the mail today and these caught my eye.
You can decide, however, how long and wide you want your apron ties to be. For the length, I wanted mine to begin as a band running across the top of the apron, then criss-cross in the back, and tie in a bow in the front. I tested this on myself and came up with an approximate measurement of 130″. Sounds like a lot, right? But the ties are actually running around the waist twice, and you want to leave plenty of room to tie a nice bow in the front. So I’d say 130″ is actually the minimum, and you should estimate based on the size of the person who will be wearing the apron. It’s better to have a little extra than not enough.
Next decide how wide you want your ties to be. I wanted mine to look substantial, so I chose a 1 and 3/4 inch width. (1 and 1/2 or 2 inches would have been fine too.) The strips you cut will need to be about 4 times the width you’ve chosen. This is NOT exact, but for the sake of simplicity, it’s close enough. So, for my apron tie strips, I needed 1 and 3/4 x 4, or 7 inch-wide strips. (If you love your bias strip maker, just use that. Follow the manufacturer’s instructions regarding how wide your strip should be. Just keep in mind that when a bias strip maker’s package says that it makes 2 inch bias strip, that means 2 inch single-fold bias strips. That will only be a 1 inch double-fold bias strip. If none of that makes any sense to you, just ignore it! You can make your apron ties by hand, and that’s what I did here.)
Now that you’ve figured out the dimensions you need for your strips (for me, it was 7″Wx130″L), you’re ready to cut. You may not have a piece of fabric that’s 130 inches long (I didn’t), but that’s okay. You’ll just cut two or three strips and then piece them together. The homespun cotton that I chose for the ties and the trim at the bottom was 45″ wide, and 44″ after I cut off the selvedge. So by using strips cut from three lengths of my trim fabric, I get ties that are 132″ long (44″ times 3 = 132″: perfect!) Here’s how to piece your strips together: lay the pieces together, right sides facing each other, and sew a line 1/4″ from the edge. Press the seams to one side. Tah-dah! Now you have one long strip. On each end of the strip, fold about 1/4″ in, press, and hem. This will hide the raw edges on each end of your apron ties.
You also need to make one small strip for the trim at the bottom of the apron. You can make this the same width as your apron ties, or make it any size you like. I made mine the same width as my apron ties. The length should be about 3/4 of an inch longer than your apron is wide (so that you can hem the ends.) So since my apron is 18″ wide, I cut a strip 7 inches wide and 18 and 3/4 inches long. To hem this piece, I recommend actually lining it up with your apron fabric and folding the ends under so that the hemmed strip will line up perfectly. Fold and press the ends under, and hem just as you did for the other strip.
The ties of your apron, as well as the trim at the bottom of the apron are basically just continuous double-fold bias strips. The easiest way I can explain the process is this (but trust me, it sounds a lot more complicated than it really is): Fold your strip in half lengthwise and press all the way down the length of the strip. Press it well because the line you create by pressing is your guide for the next step. Unfold the fabric. Now fold each raw edge toward your pressing line in the middle and press. You want the raw edge to come close to, but not quite reach the pressing line you created. Continue folding and pressing the raw edges all the way down the length of your strip. When you’re done, fold the entire strip in half again lengthwise and press again, all the way down the strip. Now you have a long strip: it’s the same length you started with, but it’s about 1/4 of the width, and the raw edges are neatly hidden inside the folds. At this point, you should pin the fabric together all the way down the length of the strip to hold it exactly in place until you sew it together. If all that makes your head explode, you could just buy bias tape, but that’s no fun! It’s worth learning to make your own because you can make exactly the width you want, and you can use any fabric you like. It also has lots of uses.
Once you’ve finished folding, pressing, and pinning your strips, you’re almost done! Slide the top of the dishtowel into the fold of the long strip, making sure to line up the center of the dishtowel with the center of the strip, and pin in place. Now sew all the way down the strip about 1/4 inch from the edge of the open side. In the process, you’ll be sewing the tie to the top of the dishtowel. Next, use the same process to sew the short strip to the bottom of the dishtowel: slide the bottom of the dishtowel into the fold of the strip, make sure the edges line up straight, and sew a line about 1/4 inch from the edge of the open side of the strip.
Now you can embellish any way you’d like. I wanted to keep it pretty simple, but I did sew ric rac along both edges where the trim fabric met the dishtowel. You could also sew on some ribbon, or even do some embroidery. Last but not least, be sure to put on your new apron and frolic around your kitchen looking cute. Yes, that’s the most important step of all.


