Must Love Dots
May 23, 2008 at 12:38 pm 5 comments
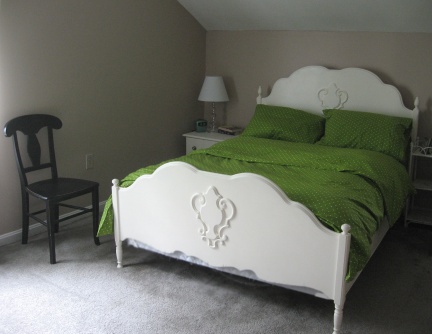
A couple of weeks ago, I was thrilled to find some very cool sheet sets(green with white polka dots!) at a very cool price. Yes, I get excited about sheets. What can I say– I’m a textile geek. I snapped up two sets– we need four pillowcases anyway, and it’s nice to have an extra fitted sheet. With the two flat sheets, I made a duvet cover for our down comforter. Nothing complicated about it, but I thought I’d share the process in case it helps to get someone else’s wheels turning.
—————————————————————————————
(1) Since all the seams on the sheets are already finished, a top-stitch around the perimeter should be sturdy enough to hold the duvet cover together– so no need to sew the whole thing together inside out and turn. Just pin the two sheets together, right sides OUT. I used what had been the tops of the sheets as the bottom of my duvet. [Here’s why: at the top of these particular sheets, like many sheets, about six inches of the fabric was turned over at the top and sewn down when it was manufactured. At the bottom and on the sides, there is only about half an inch of fabric turned over. Since the bottom of my duvet cover is going to have an opening (although it will be closed with velcro, buttons, or snaps), a little bit of the inside of the duvet cover will sometimes be visible and I don’t want the wrong side of the fabric to show.]
(2) Begin sewing (using a pretty small machine stitch for strength) about four inches from the center of what will be the bottom of the duvet. I chose a seam allowance that felt right when I lowered the foot (remember you’re dealing with sheets that already have seams around the edges, so you do have to work around them.) When you begin, you want to start with at least four or five backward stitches, and then start going right over them again as you begin sewing forward. Do the same thing when you reach the end of the seam– this will strengthen the places you’re going to be yanking on when you pull your duvet in and out of the cover for washing. Sew all the way around the outside (yawn) and stop about four inches from the other side of the bottom of the duvet, leaving about an eight inch gap. The easiest way to close the gap is with iron-on velcro. Buttons would be great if your machine makes buttonhole.
(3) If you get annoyed with the duvet sliding around and bunching up inside the cover, try this trick: sew ribbon ties onto each cover of your duvet, and a ribbon loop into each corner of the duvet. Then when you put the cover on, you can just tie the corners into place, and no more slipping around! When I lived in Japan, I noticed that many duvets and duvet covers came this way when you purchased them– genius! I haven’t gotten around to doing this yet because I was eager to get my new duvet onto my bed, but I plan to.
I hit one unexpected snag– it turned out the sheets were not exactly the same size. Yes, they were both full-sized sheets, the exact same brand, style, and color, but one of them was a full two inches longer than the other. So my plan for this to be a super simple project didn’t quite work out. I had to trim the excess off of the longer sheet and hem it, and then topstitch the two sheets together. Grrrrr.
If you don’t have two matching flat sheets, you could use two coordinating sheets. This would be a great use for vintage thrift store finds. You could simply use one as the front of the cover and one as the back, or if you really wanted to make things interesting, you could cut the sheets up and piece them back together so that you had part of each sheet on both the front and the back. You could do this in a very simple manner by cutting one strip out across the width of each sheet and then sewing it into the other. Maybe I’ll try that next time.
————————————————————————————–
Oh, and P.S.– no comments about my shoddy bed-making! I come from the toss-your-duvet-on-the-bed-and-be-done-with-it school of thought, and I wouldn’t have it any other way.
Entry filed under: sewing. Tags: blogging, crafts, photography, sewing.
5 Comments Add your own
Leave a reply to bittycakes Cancel reply
Trackback this post | Subscribe to the comments via RSS Feed


1. rox | May 23, 2008 at 12:47 pm
I wish I could do stuff like that. I really want to take a sewing class but haven’t had the chance yet, but it’s on the to do list!
I love the bed frame. I usually prefer iron beds over wood frames, but this one is beautiful!
2. paperseed | June 6, 2008 at 12:08 am
I’m impressed! We totally need a new duvet, but I just don’t feel motivated to make one and the one I really want from Crate & Barrel is a small fortune. Ah well.
3. bittycakes | June 10, 2008 at 12:26 pm
Rox- Thanks! I actually found this bed on the curb on trash day. It had a wood finish that needed work so I painted it antique white. I recently saw this bed and wondered if I should have tried antique black:
http://www.ethanallen.com/product?productId=1177&categoryId=8028
Maybe I’ll get lucky on trash day or at a yard sale and get my chance to try it in my guest bedroom!
4. bittycakes | June 10, 2008 at 12:38 pm
Paperseed- thanks. I know what you mean about duvet covers, why are they so darn expensive?! Ikea is a cheaper option, but the quality might not be so great.
5. Metempsychoses | June 19, 2008 at 4:19 am
Somehow i missed the point. Probably lost in translation :) Anyway … nice blog to visit.
cheers, Metempsychoses.